Oily Residue on Your GPU PCB? Thermal Pad Silicone Oil vs Capacitor Electrolyte vs Glue Residue Diagnosis Guide
Key Summary
Oily residue on a graphics card PCB is usually silicone oil bleeding from a thermal pad, not capacitor electrolyte — and electrolyte is not even oily, but a water-soluble salt solution. This guide separates silicone oil, electrolyte, and glue or flux residue by location, colour, texture, and temperature, using five suspect layers and a seven-step diagnosis before any cleaning begins.
The Counter-Intuitive Core: Oily Residue Does Not Mean a Leak
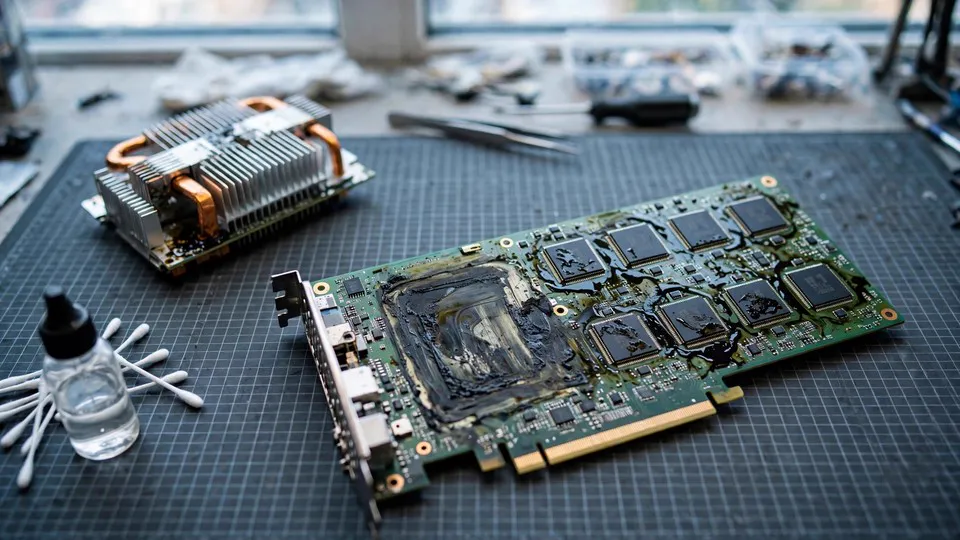
The most common misdiagnosis in this area starts with a single glance. A graphics card is opened for cleaning or a pad change, an oily sheen is visible on the printed circuit board, and the conclusion follows immediately: a capacitor has leaked, and the card is failing. That conclusion is wrong more often than it is right, and the reason is a simple fact about what is actually on the board. The most common oily residue on a graphics card PCB is not electrolyte at all. It is silicone oil that has bled out of a thermal pad or thermal putty.
A silicone thermal pad is a composite material: a siloxane elastomer loaded with thermally conductive filler. When cross-linking is incomplete, unreacted low-molecular-weight silicone oil remains inside the material. At high temperature its viscosity drops, and the oil migrates to the surface of the pad — a process described as bleeding or blooming. The same behaviour has been documented in thermal putty: Igor's Lab reported in May 2025 that the thermal putty on a Gigabyte RX 9070 Gaming OC separated oil even at room temperature, sitting still, with no heat or mechanical influence, forming an expanding oil stain on white paper within six weeks. Under thermal load, an oil-rich carrier releases oil in layers, and in a vertically mounted card the material can slowly creep under its own weight and thermal expansion and contraction. The consequences Igor's Lab described were a reduced thermal contact area, local hotspots, and oil migrating onto conductors.
This is the counter-intuitive core of the whole guide: seeing oil does not mean seeing a leak. Electrolyte from an electrolytic capacitor is not an oil at all. As a hobbyist electronics discussion puts it, what leaks from an electrolytic capacitor is a heavy salt-water solution — not oily, and water-soluble — and it is corrosive enough to attack metal. The two substances look superficially similar when they are spread thinly across a dark board, but they are chemically different things, they come from different places, and they behave differently when the card heats up. Treating them as the same thing is how a healthy card gets condemned and how a genuinely leaking capacitor gets wiped away and ignored.
There is a second counter-intuitive point, and it is the diagnostic endpoint of this guide: the oil itself is not the fault. The fault, when there is one, is the pad. A pad that is drying out, hardening, cracking, thinning, or losing its elasticity has already lost its ability to make proper thermal contact, and wiping the oil off the board does nothing to restore it. The oil is a symptom. The pad is the cause. A card whose pads are still soft and whose memory temperatures are normal does not need new pads simply because oil is visible — and a card whose pads have dried out needs new pads even after the oil has been wiped clean, because the memory temperature will still be high.
Visual inspection has a hard limit, and it should be stated plainly at the start rather than discovered at the end. Visual inspection alone cannot resolve every ambiguous case. This guide pushes visual diagnosis as far as it can go — location, colour, texture, and a temperature comparison, applied in a fixed order — but when the three-way comparison still cannot separate the candidates, or when corrosion, a strange smell, or abnormal card behaviour is present, the correct next step is inspection by a technician, not a further round of guessing. The seven steps below are built around that limit: they end with a stop line, not with a forced answer.
The Three-Way Comparison
Silicone oil, electrolyte, and glue or flux residue can be separated on four dimensions at once: where the residue sits, what colour it is, what it feels like, and what it does when the card gets hot. No single dimension is enough on its own, because each substance can resemble another on one dimension. Together, the four dimensions form a table that is the heart of this guide, and it is a table that appears in no neighbouring article: the neighbouring guide on capacitor leakage compares electrolyte against glue and flux residue only, and never mentions pad silicone oil at all.
| Residue | Where it sits | Colour | Texture | Behaviour when hot |
|---|---|---|---|---|
| Silicone oil from a thermal pad or putty | Around the VRAM or VRM thermal-pad contact area | Clear or pale | Smooth, slippery, not sticky; never dries into a hard crust | Spreads or newly appears after the card heats up |
| Capacitor electrolyte | At the top vent or the bottom seal of a capacitor | Brown-yellow or red-brown | Wet and sticky, then dries hard into a crust | Does not spread from a single heating session |
| Fixing glue | At the factory glue points | White, rubber-like | Elastic, rubbery | Fixed in place, does not spread |
| Aged glue or flux residue | At solder joints or glued points | Brown (aged glue) or brown-yellow hard lumps (flux) | Hard, stuck fast | Fixed in place, does not spread |
The location dimension is the strongest starting point. Silicone oil appears where a thermal pad touches the board — around the memory chips and the voltage-regulation components. Electrolyte appears at a capacitor: from the vent on the top, or from the seal at the bottom. Fixing glue appears at the points where the factory glued components in place, and flux residue appears around solder joints. A residue that follows no component at all — spread randomly, with no relationship to pads, capacitors, glue points, or joints — belongs to a different layer, covered below under foreign contamination.
The colour dimension narrows it further. Silicone oil is clear or pale, which is why it is often noticed as a sheen rather than as a stain. Electrolyte is brown-yellow or red-brown. Aged glue is brown, and flux residue is a brown-yellow hard lump. Colour alone cannot decide, because a thin film of electrolyte can look pale and a thick pool of silicone oil can pick up dust and look darker — but colour combined with location already excludes most wrong answers.
The texture dimension is where the three candidates separate most clearly, and it is the one that requires touching the residue. Silicone oil is smooth and slippery, and it does not dry into a hard crust. Electrolyte is wet and sticky while fresh, and hardens into a crust as it dries. Fixing glue is white and rubber-like, with visible elasticity. Flux residue is a hard lump stuck fast to the board. A clean, lint-free cloth can be used to touch one small corner of the residue — never a large area, and never before the residue has been photographed — and the difference between slippery, sticky, rubbery, and hard is usually obvious at once.
The temperature dimension is the decisive one for silicone oil, and it is the only dimension that uses time rather than appearance. Silicone oil follows temperature: low-molecular-weight silicone oil inside a pad drops in viscosity when hot and migrates to the surface, so the stain grows or appears after the card has been under load. Electrolyte and glue residue do not spread because of a single heating session. A photograph taken cold, compared with a photograph taken after the card has run under load, is the strongest single piece of evidence for the silicone-oil layer — and it is evidence that costs nothing except patience.
The Five Suspect Layers
Every oily residue on a graphics card PCB sits in one of five layers. The layers are listed here so that each later step can be read as testing one of them, and so that a result can be mapped to a layer without guessing.
Layer 1: The Thermal Pad and Putty Layer — Silicone Oil Bleeding and Blooming
This layer is silicone oil bleeding out of a thermal pad or thermal putty. Its mechanism is described above: incomplete cross-linking leaves unreacted low-molecular-weight silicone oil in the material, and heat lowers its viscosity until the oil migrates to the surface. A manufacturer technical article from Sheen Technology, which sells non-silicone pads and should be read with that interest in mind, describes the same migration under the name blooming: low-molecular-weight siloxane oligomers migrate to the surface during thermal cycling, and can condense on optical parts, poison electrical contacts, and prevent adhesives and protective coatings from wetting a surface properly. A forum discussion from AnandTech, published 25 May 2023 and quoting a manufacturer's explanation, adds the production details: excess hydrogen silicone oil worsens bleeding, and methyl silicone oil or white-oil plasticiser added during production can also cause it. The forum source is corroboration for the mechanism only, not a sole basis for it.
The layer's strongest clue is the temperature comparison: the residue spreads or newly appears after the card heats up. Its diagnostic endpoint is not the oil but the pad itself — whether the pad is dry, hard, cracked, thinned, or has lost its elasticity.
Layer 2: The Capacitor Leakage Layer — Electrolyte
This layer is electrolyte leaking from an electrolytic capacitor. Its characteristics were verified in the neighbouring guide on capacitor leakage, whose source list was checked in October 2026: the liquid is brown-yellow or red-brown, wet and sticky at first and then drying hard into a crust, corrosive and conductive, seeping from the top vent or the bottom seal, with a bulging top as an associated sign. The important correction this layer carries is that electrolyte is not an oil. It is a water-soluble salt solution, and it corrodes nearby copper foil. That corrosion — discolouration of the copper around the capacitor — is often more informative than the liquid itself, because the liquid may have dried while the corrosion remains.
The layer's strongest clues are location at a capacitor, the brown-yellow or red-brown colour, the sticky-to-crust texture, and the associated signs: a bulging capacitor top, leakage marks at the bottom seal, and corroded copper foil nearby. All three associated signs together make this layer highly credible; none of them present makes it much less so.
Layer 3: The Glue and Flux Residue Layer
This layer is factory fixing glue and flux or rosin residue left from production or from a previous repair. Fixing glue is white and rubber-like, with visible elasticity — it is there by design, holding a component in place. Aged glue turns brown. Flux residue appears as brown-yellow hard lumps stuck fast around solder joints. None of these is a leak, and none of them spreads with temperature. Their defining feature is that their position is fixed: they sit exactly where they were put, and they do not move.
This layer is the one most often confused with electrolyte, because aged glue is brown and flux residue is brown-yellow, the same colours as dried electrolyte. The separation is texture and position: glue and flux are hard and fixed, while electrolyte is a liquid that came from a capacitor, wet and sticky before it dried, and accompanied by corrosion or a bulging capacitor.
Layer 4: The Foreign Contamination Layer
This layer is contamination from outside the card: spray oil such as a WD-40-type product, residue left by a previous repair, or oil from the environment inside the computer case. Its defining feature is that it does not follow any component. It is distributed randomly, with no relationship to pads, capacitors, glue points, or joints. A residue in this layer cannot be diagnosed by the three-way table, because the table assumes the residue came from something on the board. If the residue follows no component, the three-way comparison should be set aside and the history of the card considered instead: whether anything was sprayed near it, whether it was handled during a repair, and what the inside of the case looks like.
Layer 5: The Location and Time Layer
This layer is not a substance but a method: where the residue is, when it appeared, and whether it appears when hot or is always there. Silicone oil migrates with temperature and grows after heating; electrolyte and glue residue do not spread from a single heating session. This layer is what turns four separate observations into a diagnosis. A residue in the pad contact area that is clear, slippery, and larger after load is silicone oil on three dimensions at once. A residue at a capacitor that is brown-yellow, sticky, and unchanged by heat, with a bulging capacitor nearby, is electrolyte on three dimensions at once. When the dimensions disagree with each other — for example, a residue in the pad area that is sticky and crusted — that disagreement is itself information, and it means the case is ambiguous and should not be forced into one layer.
| Layer | What it covers | Strongest clue | What would weaken it |
|---|---|---|---|
| 1. Thermal pad and putty | Silicone oil bleeding and blooming | Residue spreads or appears after heating | Residue is sticky, crusted, or fixed in place |
| 2. Capacitor leakage | Electrolyte from a capacitor | Brown-yellow liquid at a capacitor vent or seal, with bulging top or corroded copper | No bulging, no seal leakage, no corrosion nearby |
| 3. Glue and flux residue | Fixing glue, aged glue, flux or rosin | White rubber-like glue or hard brown-yellow lumps, fixed in place | Residue is wet, slippery, or spreading |
| 4. Foreign contamination | Spray oil, previous repair residue, case environment oil | Random distribution, following no component | Residue clearly follows a pad, capacitor, or glue point |
| 5. Location and time | Where, when, and whether heat changes it | Cold-versus-hot photograph comparison | No temperature change observed, or no photographs taken |
The Conductivity Disagreement: Both Sides, Stated Plainly
One question about silicone oil has two published answers that disagree, and this guide states both of them rather than settling the question, because neither side can be presented as settled fact.
On one side, silicone oil itself is an electrical insulator. A manufacturer FAQ from Volsun, which sells silicone pads and should be read with that interest in mind, states that silicone thermal pads are chemically inert, contain no corrosive components, can sit directly against copper, gold, and aluminium, and have a volume resistivity of at least 1.0 × 10¹² ohm-cm, providing electrical isolation. A technical article from LTPCBA, published around 21 October 2026, makes the same distinction in general terms: oils, greases, silicones, and organic films are non-ionic residues, which are dielectrics — their main problem is adhesion and coating defects, not short circuits. Ionic residues, such as flux activators, salts, acids, chlorides, and sulfates, are the ones that conduct, lower surface insulation resistance, and form conductive paths in moisture, leading to electrochemical migration and short circuits. On this reading, silicone oil on a board is a contamination and adhesion problem, not an electrical one.
On the other side, Igor's Lab's laboratory testing of thermal putty lists, among the consequences of oil separation, oil migrating onto conductors and causing short circuits. That is a laboratory finding on a specific model's putty, and it cannot be generalised to every pad — but it also cannot be dismissed, because it describes a real observed outcome rather than a theoretical property. One plausible reconciliation, offered here as a reading of the two sides rather than as a fact, is that the oil film itself does not conduct, but it can interfere with contacts and coatings, or carry conductive contaminants with it, and the failure then appears at the conductor rather than in the oil.
This guide does not choose between the two sides. The practical stop line is the same either way: if the three-way comparison cannot separate the candidates, if corrosion is visible, or if the residue is accompanied by abnormal card behaviour, stop and bring the card for inspection. Do not write "silicone oil causes short circuits" as a fact, and do not write "silicone oil is completely safe" as a fact either. Both statements go beyond what the sources support.
The Seven-Step Diagnosis
The seven steps below are ordered so that the cheapest and most decisive comparisons come first, and so that each step's result decides which step follows. They should be worked through in order, with the record kept as they go, rather than jumped between.
Step 1: Characterise the Residue — Photograph It Before Touching It
Photograph the residue before wiping anything. Record where it is, what colour it is, what texture it appears to have, and which components are nearby — memory chips, voltage-regulation components, capacitors, or glue points. Photograph the whole board as well, so the position can be checked against it later. Once the residue is wiped away, that comparison is gone. This step is the foundation for everything that follows, and skipping it means the later steps have nothing to compare against.
Step 2: Use Location to Fork Between the Layers
Apply the location fork. Residue in the VRAM or VRM thermal-pad contact area points toward the silicone-oil layer. Residue at the top or bottom of a capacitor points toward the electrolyte layer. Residue at a fixing-glue point or near a solder joint points toward the glue or flux layer. Residue that follows no component at all points toward the foreign-contamination layer. This step does not decide anything on its own; it says which layer to test first in the steps that follow.
Step 3: Compare Texture and Colour
Using a clean, lint-free cloth, touch one small corner of the residue — never a large area. Silicone oil is clear or pale, smooth, slippery, and not sticky, and it never dries into a hard crust. Electrolyte is brown-yellow or red-brown, wet and sticky, drying into a hard crust, and the copper foil nearby may already be discoloured or corroded. Fixing glue is white, rubber-like, and elastic. Flux residue is a brown-yellow hard lump, stuck fast and unmoving. Record what was actually felt, not what was expected: a residue in the pad area that turns out sticky and crusted is disagreeing with the silicone-oil layer, and that disagreement matters.
Step 4: Run the Temperature Comparison
Photograph the residue with the card cold, then run the card under load, let it heat up, and photograph the same area again. Silicone oil migrates with temperature, so the stain grows or newly appears after heating. Electrolyte and glue residue do not spread because of a single heating session. This step is the strongest single piece of evidence for the silicone-oil layer, and it is also the step that most often overturns a first impression: a stain that looked alarming when cold and has not changed at all when hot is behaving like glue or dried electrolyte, not like bleeding silicone oil.
Step 5: Check the Capacitors Around the Residue
If electrolyte is suspected, check the capacitors near the residue: is the top bulging, is there a leakage mark at the bottom seal, and is the nearby copper foil corroded or discoloured? All three present together make the electrolyte layer much more credible. All three absent makes it much less credible. A bulging top is an associated sign, not a necessary condition — electrolyte can also seep from the bottom seal with a flat top — so a flat top does not clear the capacitor. But a flat top, a clean seal, and clean copper together, next to a clear slippery residue in the pad area, is a strong combination against the electrolyte layer.
Step 6: Check the Pad Itself, Not Just the Oil
If silicone oil is suspected, do not look only at the oil — look at the pad. A pad that is dry, hard, cracked, thinned, or has lost its elasticity is the signal that a pad change is needed, and the memory temperature should be checked against it. The neighbouring guide on memory junction temperature covers how to read VRAM temperatures; this guide uses only that concept, not its replacement instructions. Oil present with a pad that is still soft and temperatures that are normal is not, on its own, a reason to replace the pad immediately. Oil wiped away while the pad continues to dry out leaves the same high memory temperature behind, because the cause was never the oil.
Step 7: Run a Local Cleaning Test, Then Seek Inspection
Dampen a lint-free cloth with isopropyl alcohol and gently wipe one small corner of the residue, then observe over the following days whether it seeps out again. Silicone oil will slowly seep back, because the pad itself is still bleeding. Electrolyte will not seep back in that slow way — it is leaking, and new liquid will keep appearing. Stop and bring the card for inspection in the following situations: electrolyte is suspected and corrosion is visible; the three-way comparison has been completed and the residue still cannot be separated; or the residue is accompanied by a strange smell, a burning smell, or abnormal card behaviour. Bring the photographs from Step 1, the cold-versus-hot comparison photographs, and the result of the cleaning test.
| Step | What to do | Result that narrows the residue | Next step |
|---|---|---|---|
| 1 | Photograph the residue and the whole board before touching it | Position, colour, texture, and nearby components recorded | Step 2 |
| 2 | Fork by location: pad area, capacitor, glue point, or nowhere | One layer becomes the leading candidate | Step 3 |
| 3 | Touch one small corner with a clean lint-free cloth | Slippery and clear — silicone oil; sticky and crusting — electrolyte; rubbery or hard and fixed — glue or flux | Step 4 |
| 4 | Photograph cold, then again after load | Residue grows or appears when hot — silicone oil; unchanged — electrolyte or glue | Step 5 |
| 5 | Check nearby capacitors for bulging, seal leakage, corroded copper | All three present — electrolyte credible; all absent — electrolyte unlikely | Step 6 |
| 6 | Check the pad itself: dry, hard, cracked, thinned, lost elasticity; check memory temperature | Pad worn — pad change is the real follow-up; pad soft and temperatures normal — no immediate change needed | Step 7 |
| 7 | Local isopropyl-alcohol cleaning test on one small corner; observe for days | Slowly seeps back — silicone oil; keeps leaking — electrolyte | Inspection with full record if still unclear |
Prevention: Keeping the Next Residue From Being Misread
Prevention here is less about stopping oil from appearing — a pad will bleed as it ages, and that is a property of the material — and more about keeping the conditions that make diagnosis possible from being destroyed. The single most useful habit is the one in Step 1: photograph the board before cleaning it. A card that is wiped clean before anyone looks at it has lost the evidence that would have separated silicone oil from electrolyte, and the next person to see it has to start from nothing.
When a card is opened for cleaning or a pad change, note the condition of the pads as they are found — soft or dry, whole or cracked — and note the memory temperatures before and after, so that the next time oil appears there is a baseline to compare against. When pads are replaced, the thickness must match the original: the neighbouring guide on pad replacement records that a 2 mm pad fitted in a 1.5 mm gap raised GPU temperature by nearly 20°C, and that a 3090 Founders Edition dropped from around 110°C to around 85°C after a pad change with the correct thickness. Too thick a pad lifts the heatsink away; too thin a pad leaves a gap unfilled. The thickness is a measurement, taken with calipers from the original pad once the card is open, not a guess.
Boundaries: When the Problem Belongs to Another Guide
Residue diagnosis shares symptoms with several neighbouring problems, and the boundaries are worth stating plainly, because working through the wrong guide wastes the time the right guide would have used.
If the question is only electrolyte versus glue or flux residue, with no mention of pad silicone oil, that is the neighbouring guide on capacitor leakage, which compares those two candidates in depth. If the question is only about replacing thermal pads or reading memory junction temperatures, with no residue to identify, that is the neighbouring guide on pad replacement and memory temperature. If capacitor tops are already visibly bulging, bottom seals are already leaking, and copper foil is already corroded, the electrolyte path is already established and the three-way table in this guide is not needed. If the residue is accompanied by a burning smell or abnormal card behaviour, stop and seek inspection rather than continuing with visual comparison. And if the question is only how often thermal pads should be replaced, that is a replacement-interval question, not a residue-identification question, and this guide does not answer it.
The boundary that most often causes confusion is the one with the capacitor-leakage guide, because the two guides share the electrolyte side of the comparison. The test that separates them is the third candidate: if pad silicone oil is in the running at all — if the residue is in the pad contact area, clear, slippery, and growing when hot — then this guide is the one to use. If silicone oil has been ruled out and only electrolyte versus glue remains, the capacitor guide is the one.
Six Misconceptions
1. Oily residue means a capacitor has leaked. It does not. The most common oily residue on a graphics card PCB is silicone oil bleeding from a thermal pad or putty, and electrolyte itself is not oily — it is a water-soluble salt solution. Seeing oil and concluding that a capacitor has burst is the most common misdiagnosis in this area.
2. Silicone oil conducts electricity and will short the card. That is only half true, and the half that is wrong matters. Silicone oil itself is an electrical insulator, with a volume resistivity of at least 10¹² ohm-cm, chemically inert, and non-corrosive to metal. But a laboratory finding reports that oil migrating onto conductors can cause short circuits. The two statements disagree, and neither should be written as settled fact.
3. Wiping the oil away means the card is fixed. It does not. The oil is only a symptom; a dried-out or aged pad is the cause. Wiping the oil does not restore the pad's thermal contact, and memory temperature will still be high. The pad's condition — dry, hard, cracked, thinned, lost elasticity — is what actually needs following up.
4. Glue residue is the same as a leak. It is not. Fixing glue is white and rubber-like by design, holding a component in place. Aged glue is brown, and flux residue is a brown-yellow hard lump. All of them are fixed in position and do not spread with temperature, and none of them is electrolyte.
5. Capacitor leakage always means the top has burst open. It does not. Electrolyte can seep from the top vent, and it can also seep from the bottom seal. A bulging top is only one associated sign among several, not a necessary condition, and a flat top does not rule out a leak.
6. Thicker thermal pads are always better, and any pad will do. They are not. Thickness must follow the original: too thick a pad lifts the heatsink and can raise GPU temperature, and too thin a pad leaves a gap unfilled. The neighbouring pad-replacement guide records a 2 mm pad fitted in a 1.5 mm gap raising GPU temperature by nearly 20°C. Take the original pad's thickness with calipers first, then match that thickness in the same spot.
Sources
External sources are cited here by source and date only, as published material consulted for this guide, not as testing carried out by this site. Igor's Lab, May 2025, two articles on the Gigabyte RX 9070 Gaming OC thermal putty and oil separation. Sheen Technology, manufacturer technical article on non-silicone thermal pads. Volsun, manufacturer FAQ on silicone thermal pads. LTPCBA blog, "Why PCBA Corrodes", around 21 October 2026. AnandTech forum discussion, 25 May 2023, quoting a manufacturer's explanation of silicone oil bleeding. Hobbyist electronics forum discussion on electrolytic capacitor leakage. The electrolyte characteristics and source list used here were verified in the neighbouring guide on capacitor leakage in October 2026 and are cited as such, not as new verification in this guide. Neighbouring guides on this site are referred to by subject for boundary purposes only; their mechanisms are not reproduced here.
FAQ
I see oily residue on my GPU PCB — does that mean a capacitor is leaking and the card is about to die?
Not necessarily. The most common oily residue is silicone oil bleeding from a thermal pad or thermal putty, not electrolyte — and electrolyte itself is not oily, but a water-soluble salt solution. It takes location, colour, texture, and a temperature comparison to separate them, so do not conclude that a capacitor has burst just because oil is visible.
How do I tell silicone oil apart from capacitor electrolyte leakage?
Look at four things: location (silicone oil sits in the VRAM or VRM thermal-pad contact area, while electrolyte sits at the top vent or the bottom seal of a capacitor), colour (silicone oil is clear or pale, electrolyte is brown-yellow or red-brown), texture (silicone oil is smooth and not sticky, while electrolyte is wet and sticky and dries into a hard crust), and associated signs (with electrolyte, the capacitor top may be bulging and the nearby copper foil may be corroded or discoloured).
Is silicone oil electrically conductive — can it short out my graphics card?
Silicone oil itself is an electrical insulator (volume resistivity of at least 10¹² ohm-cm), chemically inert, and non-corrosive to metal. But a laboratory finding reports that oil migrating onto conductors can cause short circuits — the two accounts disagree, and neither side can be written as settled fact. If the residue cannot be separated, if corrosion is visible, or if abnormal card behaviour accompanies it, the card should be brought for inspection.
If I wipe the oily residue away, is it fixed?
No. The oil is only a symptom; a dried-out or aged thermal pad is the cause. Wiping the oil away does not restore the pad's thermal contact, and VRAM temperature will still be high. What actually needs following up is whether the pad itself is dry, hard, cracked, or thinned, and whether VRAM temperature is abnormal.
How do I tell glue residue apart from a leak?
Fixing glue is white and rubber-like, with elasticity, and is there by design. Aged glue is brown, and flux residue is a brown-yellow hard lump; both sit in a fixed position and do not spread with temperature. Electrolyte is a liquid seeping from a capacitor, wet and sticky, drying into a crust, possibly with corrosion nearby. Residue that stays fixed in place and does not spread is usually glue or flux residue.
Why does the oily residue spread after the card gets hot?
Because silicone oil bleeding follows temperature: low-molecular-weight silicone oil inside a thermal pad that has not fully cross-linked drops in viscosity at high temperature and migrates to the surface. Photograph the residue cold, then again after the card has been under load — if the stain has grown or newly appeared, that is the strongest evidence for the silicone-oil layer. Electrolyte and glue residue do not spread because of a single heating session.
Does capacitor leakage always mean the top has burst open?
No. Electrolyte can seep from the top vent, and it can also seep from the bottom seal; a bulging top is only one associated sign, not a necessary condition. When checking, look at the bottom seal for leakage marks as well, and check whether the nearby copper foil is corroded or discoloured.
If I suspect it is electrolyte leakage, what should I do?
Do not wash a large area, and do not wash it with water. First photograph the position and colour, then check whether the nearby capacitor tops are bulging, whether the bottom seals show leakage, and whether the copper foil is corroded. If corrosion is visible, if there is a strange smell, or if the card is behaving abnormally, stop and bring the card for inspection with the photographs. Inspection is charged under the website's published three-tier pricing of HK$400–2,800, with the actual price confirmed after inspection.
When replacing thermal pads, is thicker always better?
No. Thickness must follow the original: too thick a pad lifts the heatsink and can raise GPU temperature, while too thin a pad leaves a gap unfilled and provides no thermal contact at all. Once the card is open, take the original pad's thickness with calipers first, then match that thickness in the same spot.
If all seven steps still cannot tell silicone oil from a leak, what should I bring for inspection?
Photographs of the residue's position and colour, cold-versus-hot comparison photographs, the result of the local cleaning test (whether the residue seeps out again after gently wiping one small corner with isopropyl alcohol), the condition of the tops and bottoms of the nearby capacitors, and VRAM temperature records. The shop is at Room 1209, Dali Plaza, Shek Mun; phone 2186 8010, WhatsApp 6558 6806.