GPU Runs Hot and Throttles Because Its Intake Is Blocked by a Neighbouring Card or the Case? Slot Position, Intake Clearance & Side-Panel Test Diagnosis Guide
Key Takeaways
When a graphics card runs hot and slows down, the cause may be starved intake rather than a failing cooler: a neighbouring card or a close side panel can block the air the fans need, so this guide tests slot position, intake clearance, and the side-panel-off comparison to separate blocked airflow from other heat problems.
What Exactly Counts as This Symptom
This guide deals with a narrowly shaped symptom, and the shape has to be matched before anything is changed. A graphics card runs hot under load, its fans spin up hard and stay loud, and performance falls away as the card lowers its clocks to protect itself. The card is not crashing, the picture is not breaking up, and nothing smells of burning. The heat arrives with load, eases at idle, and returns every time the same load is applied.
The shape has one more defining feature, and it is the feature that separates this guide from the rest of the heat guides. The temperature problem appeared, or became much worse, in a particular physical arrangement: a second card sits in the slot next to the graphics card, the graphics card sits close to the case floor or a power-supply shroud, or the graphics card intake faces a side panel with very little room in front of it. Alternatively, the problem improves noticeably when the side panel is taken off. If none of those physical facts is present, this guide may still be useful as a checklist, but its central test will probably come back negative, and another heat diagnosis is the better next step.
Several lookalike situations must be ruled out first. Heat that climbs gradually over many months of use, with dust visibly packed into the cooler fins, belongs with cleaning diagnosis before any slot discussion. A card whose hotspot temperature sits far above its core temperature while the core itself stays moderate points at a contact problem between the chip and the cooler, not at starved intake, and that distinction is explained in detail below. A card that crashes, shows artefacts, or loses the picture entirely is not a pure heat-and-throttle symptom, and a card whose fans never spin up at all is a fan or control problem, not an intake problem. If the card is quiet at idle, loud under load, hot under load, and slower under load, and the physical arrangement matches the description above, this guide applies.
The Mechanism: How a Graphics Card Breathes
Most desktop graphics cards use axial fans, and the direction those fans breathe in is the whole story of this guide. An axial fan pulls air in from the face of the card, from the side that faces away from the motherboard, and pushes it through the heatsink fins, where the heat is picked up and carried out around the edges of the cooler and toward the rear of the case. The fan does not create air. It moves the air that is available in front of its intake face, and if that air is not there, the fan can spin as fast as it likes without moving enough of it.
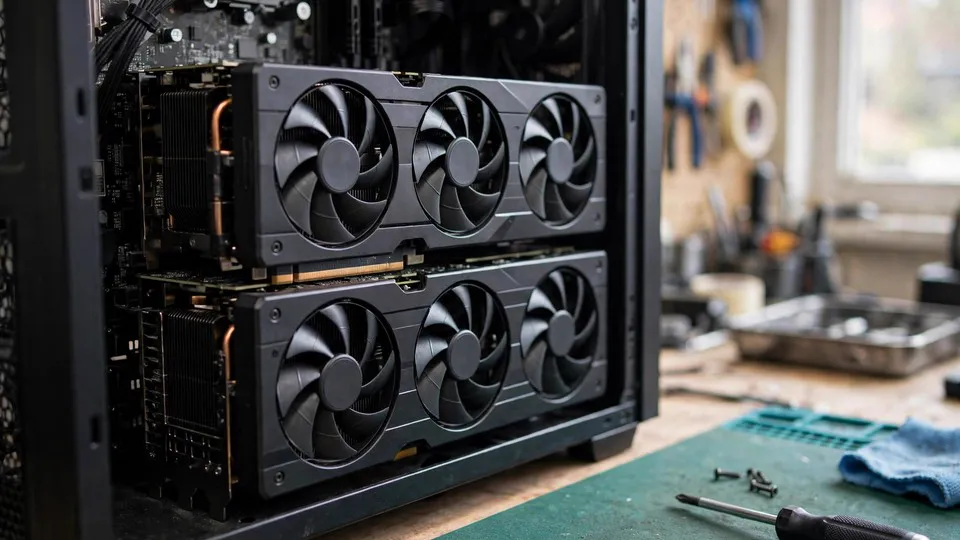
That is why the space in front of the intake face matters more than the size of the fan or the number of fans. A thick card with three large fans still needs a clear volume of air in front of those fans. Put another card in the neighbouring slot, and the intake face of the graphics card ends up staring at the back of that neighbour, with only a narrow slot of space between them. The fans then draw from a thin pocket of air that is already warm, because the neighbouring card is itself producing heat, and because the graphics card's own exhaust has nowhere else to go. The same thing happens when the intake face sits almost against a solid side panel, a power-supply shroud, a drive cage, or the floor of a compact case: the fans are working, but they are recirculating the same warm air instead of drawing in fresh cool air.
Once the intake air is warm, the rest follows in a loop. Warm intake air removes less heat from the fins, so the chip runs hotter. The fan controller responds by spinning the fans faster, which makes more noise but cannot fix the underlying shortage of cool air. The chip temperature keeps climbing until the card's own protection reduces clock speeds to hold the temperature in check, and performance falls. The card is not broken in this sequence. It is doing exactly what it was designed to do, in an arrangement that does not give it the air it needs.
The neighbouring card deserves a closer look, because it causes trouble in two ways at once. First, it physically occupies the intake space, narrowing the gap the fans can draw from. Second, it adds its own heat to that same narrow pocket, so the little air that is available is already warm before the graphics card touches it. A capture card, a sound card, a network card, or a second graphics card can all do this, and the effect is worst when the neighbour is a card that itself runs warm under load, or when the neighbour's own cooler exhausts toward the graphics card intake. The question is never whether the neighbour is a good card or a bad card. The question is only what it does to the air in front of the graphics card fans.
Slot position matters for the same reason. Motherboard expansion slots are spaced a fixed distance apart, and a graphics card that is two or three slots thick already fills more than its own slot. When such a card sits in the top slot with the next slot occupied, its intake face may have almost no clearance at all. Moving the graphics card to a lower slot, or moving the neighbour to a slot further away, changes the geometry of that intake space directly, which is why slot position is a diagnostic test in this guide rather than a matter of tidiness.
The Signature: Core and Hotspot Climbing Together
Temperature readings are the evidence in this guide, and they must be read as a pair. Monitoring software typically reports a core temperature for the graphics chip and a hotspot temperature for the hottest point measured on the chip package. In a starved-intake case, both readings climb together under load, and the gap between them stays in its usual range. The whole chip is hot because the whole cooler is being fed warm air. The fans run fast, the clocks fall back, and both readings stay high for as long as the load continues.
That paired climb is the signature that separates this guide from the contact-failure guide. When the contact between the chip and the cooler has failed, the core reading may stay moderate while the hotspot reading climbs far above it, because heat is not transferring evenly out of one part of the chip. A large, unusual gap between the two readings points at contact, not at intake. A paired climb, with both readings high and the gap unremarkable, points at the air supply, not at contact. The two patterns lead to completely different next steps, so the pair of readings must be recorded together, under the same load, before any physical change is made. A single temperature number, on its own, cannot make this distinction.
There is one caution about reading temperatures. Different monitoring tools label the hotspot reading differently, and some cards report additional readings for memory or voltage regulation. The comparison that matters here is between the core reading and the hotspot reading from the same tool, in the same session, under the same load. Switching tools halfway through the diagnosis, or comparing a reading taken during one workload with a reading taken during a different workload, destroys the comparison. Pick one tool, pick one repeatable load, and use the same pair of readings for every test in this guide.
Step One: A Baseline Under a Repeatable Load
The first step changes nothing physical at all. Record the baseline: core temperature, hotspot temperature, fan behaviour, and whether performance falls away, all under one repeatable load that can be run again after each change. A game scene, a benchmark run, or any sustained workload that reliably produces the symptom will do, provided the same workload is used for every later test. Note the slot the graphics card occupies, which neighbouring slots are occupied and by what, and how much visible clearance exists in front of the intake fans.
The baseline already answers one question. If the card stays cool under this load and only heats up under a different, heavier load, the problem may be load-dependent rather than arrangement-dependent, and the baseline for that heavier load is the one to use. If the card heats up under the chosen load and the fans are already working hard, the baseline is established and the physical tests below can begin. Every later result is judged against this baseline, and a test that changes the workload at the same time as the physical arrangement proves nothing, because two variables changed at once.
Step Two: The Side-Panel Test
The side-panel test is the single most informative test in this guide, and it costs nothing. With the machine switched off, remove the side panel, switch the machine back on, and run the same load again, recording the same pair of readings. Then refit the panel and, if the readings rose again, the comparison is complete.
If removing the panel brings both temperatures down clearly and the clocks hold up better, the case arrangement is starving the intake. The panel itself, or the narrow space behind it, was part of the blockage, and the card was recirculating warm air inside a confined space. This result does not by itself say which internal part is the culprit; it says the intake air supply inside the closed case is inadequate, and the slot and neighbour tests below then narrow it down. If removing the panel changes nothing at all, the blockage is not the panel or the general case volume, and attention moves to the neighbour and the slot geometry, which the panel test cannot clear.
Two cautions belong with this test. First, running with the panel off is a diagnostic step, not a permanent arrangement: an open case collects dust faster, and the result of the test is information, not a fix to live with. Second, the test must be run with the same load and the same monitoring as the baseline, or the comparison is meaningless. A panel-off result taken during a lighter load will always look better, and will mislead the whole investigation.
Step Three: The Neighbour Test
With the baseline and the panel result recorded, test the neighbour directly. With the machine switched off, remove the neighbouring card, or move it to a slot further from the graphics card if a suitable slot is available, and run the same load again with the side panel refitted. The panel must be refitted for this test, because the question is whether the neighbour matters inside the closed case, not whether the neighbour matters with the case open.
If the temperatures fall and the clocks hold up with the neighbour removed or moved, the neighbour was a major part of the blockage. That conclusion is about geometry and heat in a shared pocket of air, not a judgement on the neighbouring card, which may work perfectly well in a different slot. If the temperatures do not change, the neighbour is not the main cause, and the slot position of the graphics card itself becomes the next suspect. Either way, the neighbouring card should be refitted or relocated only after the result is recorded, so that the next test starts from a known state.
Step Four: The Slot-Position Test
If the neighbour test is negative, or if moving the neighbour is not practical, test the graphics card slot itself. With the machine switched off, move the graphics card to another full-length expansion slot, if the motherboard provides one and the case allows the card to fit there, and run the same load again. Record the same pair of readings, and also check what link width the new slot provides, because a lower slot on some motherboards runs at a narrower link width than the top slot, and that trade-off must be weighed honestly rather than discovered later as a surprise.
If the temperatures fall in the new slot, slot geometry was the cause, and the decision becomes a trade-off between the thermal improvement and any link-width difference, which can be judged from the card's actual behaviour in the new slot rather than from assumption. If the temperatures do not change in the new slot, slot position is not the cause either, and the investigation moves to case airflow as a whole. A slot move that changes nothing is still a useful result, because it rules out the two most common physical causes and stops further time being spent rearranging cards.
Step Five: Intake Clearance and Case Airflow
The remaining checks concern the air path into and out of the case. Look at the front of the case: are the intake fans present, spinning, and drawing air in, rather than mounted backwards and exhausting? Are the dust filters clogged? Is a drive cage, a thick bundle of cables, or a front-mounted radiator sitting directly in the intake path? Look at the exhaust: is there a clear rear or top exhaust path, or is the hot air trapped inside the case with nowhere to go? Each of these is checked one at a time, with the same load and the same readings after each change, so that the change that matters can be identified.
Fan direction deserves a specific mention, because it is easy to get wrong and hard to spot from software. A fan mounted backwards still spins and still makes noise, but it moves air in the wrong direction, and a case with its intake and exhaust reversed can starve the graphics card while appearing to have plenty of fans. The direction of each case fan should be confirmed by observation, not assumed from its position. Similarly, a case with strong exhaust and almost no intake will pull air in through every gap and filter, including gaps that draw warm air back across the graphics card, and adding an intake fan can matter more than adding another exhaust fan. The principle throughout is simple: the graphics card needs a steady supply of cool air in front of its intake face and a clear path for warm air to leave the case, and any arrangement that breaks either half of that path will show up as paired core and hotspot temperatures climbing together.
| Test | What the result proves | What it does not prove |
|---|---|---|
| Baseline pair of readings recorded | Whether core and hotspot climb together, and what the starting point is | Anything about which physical part is responsible, without the later tests |
| Side panel off, temperatures fall clearly | The closed-case arrangement starves the intake | Which internal part is the culprit, without the neighbour and slot tests |
| Side panel off, no change | The panel and general case volume are not the main blockage | That the neighbour or the slot is innocent, without testing them directly |
| Neighbour removed or moved, temperatures fall | The neighbour occupied intake space or heated the intake pocket | That the neighbouring card is faulty; the problem is geometry and shared air |
| Neighbour removed or moved, no change | The neighbour is not the main cause | Anything about slot position or case airflow, which still need testing |
| Graphics card moved to another slot, temperatures fall | Slot geometry was the cause | That the new slot is free of trade-offs; link width must still be checked |
| Graphics card moved to another slot, no change | Slot position is not the cause | Anything about case airflow, which is the remaining area |
| Case fan direction or filter corrected, temperatures fall | The case air path was broken at that point | That the card itself is fault-free in every arrangement, only that its air supply is restored |
Boundary Cases: When It Is Not Starved Intake
First, heat that climbs gradually over a long period, with dust visibly packed into the cooler fins or the case filters, is a cleaning problem first, and the slot tests should wait until the cooler and filters are clean. Second, a hotspot reading far above a moderate core reading is a contact problem, not an intake problem, and no amount of slot rearrangement will close that gap. Third, fans that never spin up, spin unevenly, or make grinding noises are a fan problem, not an intake problem. Fourth, a card that crashes or shows picture corruption at temperatures that are not extreme is not a pure throttle symptom. Fifth, a card that only overheats in one particular application while staying cool under every other load may be facing a load-specific problem, and the baseline load should be changed before blaming the arrangement.
One exclusion line covers the paste and pad series: replacing thermal paste or thermal pads does not fix starved intake, and it should not be attempted as a response to a paired core-and-hotspot climb that the side-panel test has already traced to blocked air.
Common Misconceptions
Misconception one: setting the fan curve to maximum will fix it. A fan at maximum speed still cannot move air that is not available in front of its intake face, and it only adds noise to the same warm pocket of air. Fan speed is not air supply.
Misconception two: a bigger, thicker card with more fans cannot be starved. Thickness makes the problem worse, not better, because a thicker card leaves less clearance to the neighbour and to the panel, and its larger fans need a larger volume of intake air.
Misconception three: removing the side panel permanently is the fix. It is a diagnostic result, not a permanent arrangement, and it leaves the machine collecting dust faster while hiding the question of which internal arrangement actually caused the problem.
Misconception four: the neighbouring card must be faulty if removing it helps. The neighbour may work perfectly well. The problem is the shared pocket of air and the geometry of two cards close together, not a fault in either card.
Misconception five: undervolting or lowering the power limit fixes starved intake. Those steps reduce the heat the card produces, which can mask the symptom, but they do not restore the air supply, and the card will still be limited by its arrangement whenever the load rises again. They are workarounds to consider after diagnosis, not a diagnosis.
Misconception six: hot air rises, so a card near the case floor cannot be starved. Rising warm air matters little inside a case where fans drive the airflow, and a card whose intake faces the floor or a solid shroud is starved regardless of which way warm air would drift on its own.
Misconception seven: changing the slot, the neighbour, and the fan settings all at once, and getting cooler temperatures, is good enough. A recovery with several changes teaches nothing about which change mattered, and the problem will return the next time the arrangement changes. One variable at a time is slower, but it is the only way the result can identify a cause.
When to Stop and Seek Advice
Stop rearranging hardware if any of the following appears. The card crashes or shows picture corruption, which is a different problem from throttling. A fan makes grinding noises, stops, or wobbles, which is a fan problem. Temperatures stay extreme even with the side panel off, the neighbour removed, and the card in another slot, which points beyond arrangement and needs a closer look at the cooler itself. Or any step in this guide feels unsafe, such as forcing a card into a slot it does not fit, in which case the card should be left where it is and advice sought first.
Bring four items to any inspection: the baseline pair of readings under the repeatable load, the side-panel test result, the neighbour test result, and the slot test result, stating which slots were occupied and what clearance existed in front of the intake fans. Those four let advice start from the arrangement directly, without repeating tests already done.
Readers nearby are welcome to bring their records to HK GPU Fix for advice, at Room 1209, Dali Plaza, Shek Mun, telephone 2186 8010, WhatsApp 6558 6806. Describing which neighbouring slot is occupied, what the core and hotspot readings did together, and which single change first brought the temperatures down is enough for a quick judgement on the next step.
Frequently Asked Questions
How can a card overheat when its fans are spinning fast and loudly?
Because fans move air, they do not create it. If a neighbouring card or a close panel blocks the intake face, the fans draw from a thin, warm pocket of air instead of fresh cool air, so spinning faster only recirculates the same warm air louder.
What is the difference between starved intake and a contact failure?
In starved intake, the core and hotspot readings climb together and the gap between them stays in its usual range, because the whole cooler is fed warm air. In a contact failure, the hotspot reading climbs far above a moderate core reading, because heat is not transferring evenly out of one part of the chip.
Does taking the side panel off prove the case is at fault?
It proves the closed-case arrangement starves the intake, but it does not say which internal part is responsible. The neighbour test and the slot test are still needed to narrow the cause down to a specific arrangement.
If removing the neighbouring card helps, is that card faulty?
Not necessarily. The problem is usually geometry and shared air: the neighbour occupies intake space and adds its own heat to the same narrow pocket. The same card may work perfectly well in a slot further away.
Will moving the graphics card to a lower slot always help?
No. It helps when slot geometry was the cause, but a lower slot on some motherboards runs at a narrower link width, so the thermal improvement must be weighed against that trade-off by observing the card's actual behaviour in the new slot.
Why does a thicker card with more fans suffer more from blocked intake?
Because thickness leaves less clearance to the neighbour and to the panel, and larger fans need a larger volume of intake air. More fan capacity cannot compensate for an intake face that has almost no air in front of it.
Does replacing thermal paste fix a card whose intake is blocked?
No. Paste and pads concern heat transfer inside the cooler, while starved intake concerns the air supply reaching the cooler. Replacing them does not restore blocked airflow.
Is running with the side panel off a permanent fix?
No. It is a diagnostic step that identifies the problem, not a permanent arrangement. An open case collects dust faster, and the underlying arrangement question remains unanswered.
What should I bring if I seek advice?
Bring the baseline pair of readings under a repeatable load, the side-panel test result, the neighbour test result, and the slot test result, stating which slots were occupied and what clearance existed in front of the intake fans. That record lets advice start from the arrangement rather than repeating the whole diagnosis.